If you love nail art but have grown tired of acrylic nails, then polygel nails designs sound like the perfect solution to keep your nail game strong. Those who have tried polygel nails swear they won’t go back, and for a good reason. If you think you could also benefit from polygel nail art, here we’ll tell you how to do polygel nails designs.
If you have recently become interested in polygel nails, you should know that these offer all the greatness of acrylics but are much more flexible, and just who wouldn’t like more flexible nails, right? And the best part is that you can learn how to do polygel nails designs right in the comfort of your own home.
Polygel nails aren’t only easy to apply, but they also offer the durability of a fantastic manicure; this way, you can forget about having to paint your chipped nails every two days, which is great for those who think of their nails as an essential part of their overall look.
Though it may sound intimidating, you can achieve great-looking polygel nails with the right tools and directions. If you haven’t got the slightest idea about where to start but would like to learn all about polygel nails designs, you are in the right place.
Polygel Nails Designs Explained
Polygel is a nail enhancement that’s best described as a gel-acrylic hybrid formula. You get the strength of an acrylic enhancement, but then you get some of the flexibility that comes with a gel.
It is gel-based in terms of its consistency and texture but a bit thicker. Their flexible nature also makes them more durable as time passes.
Polygel Nails Vs. Acrylic Nails
Like acrylic, polygel can sculpt, fill in, or extend nails. However, there are differences, including the fact that polygel is significantly lighter than acrylic yet just as strong. It’s also different from a dip manicure, equivalent to granulated acrylic.
Polygel is a perfect option for softer nails but not recommended for those with more brittle nails.
Poligel nails designs represent a great in-between for those who have good natural nails but want a little bit more stability and a little bit more strength without the abrasiveness of acrylics.
How To Do Polygel Nails Designs Steps
Step 1 File your nails
This helps smooth any ragged edges, so you start with a smooth surface that enhances lasting power.
[amazon box=”B0017KCQ2W” class=”lp-product-list” template=”vertical” image_size=”large” title=” ” price=” ” image_alt=”Nail Buffer by Revlon” description=”none” button_text=”Check Latest Price” ]
We recommend this Nail Buffer by Revlon. A manicure essential, this multitasking tool features two surfaces, one to shape and smooth nails and another to buff them to a glossy finish.
Use the filing sides to shape and smooth nails as desired; always file in one direction to prevent splitting. Then turn to the buffing surfaces to give nails a gorgeous sheen.
This all-in-one nail buffer block and file create perfectly shaped, smooth, shiny nails. You get both a filing surface and a smooth buffer in one handy tool.
Step 2 Choose the dual or nail forms that fit your fingers
This is an optional step, as you can also overlay the polygel on natural nails. If you do use a dual form, your kit will likely come in different sizes.
[amazon box=”B07CZGC3JX” class=”lp-product-list” template=”vertical” image_size=”large” title=” ” price=” ” image_alt=”KADS Size Dual Nail System Form” description=”none” button_text=”Check Latest Price” ]
Try KADS Size Dual Nail System Form, featuring perfect sizes for anyone’s fingers. Great for acrylic application with a nail brush. These are easy to use and save a lot of time in your nail artwork.
The full coverage nail tips are perfect for poly gel and acrylic, and the reusable nail form creates nice nail tips with a smooth surface.
Suitable for professional nail artists and the beginner or home use, the best part is these are made using environmentally friendly materials, ABS that will be good for your health.

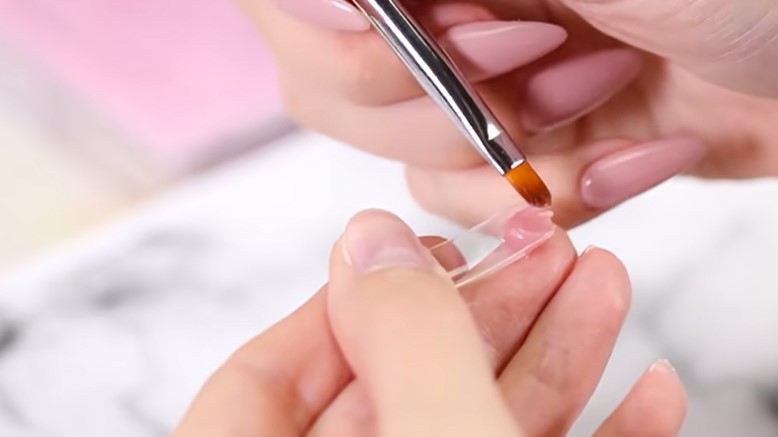
Step 3 Apply your base coat
Apply a base coat and cure it under an LED light. The amount of time underneath the light will depend on your kit, but a good rule of thumb is 60 seconds.
[amazon box=”B00HDWTFTK” class=”lp-product-list” template=”vertical” image_size=”large” title=” ” price=” ” image_alt=”Karma Organic Base Coat” description=”none” button_text=”Check Latest Price” ]
We love Karma Organic Base Coat; this two-in-one high gloss clear nail polish can be used both as a dip powder base activator and top coat and cure completely without leaving any sticky or tacky layer.
It is a good choice for those people who do artificial nail art, acrylics or use nail pigment powders. It secures the blending of the nail color and dries fast, without needing a UV/LED Light.
Karma Organic fingernail top and base coat nail polish are infused with essential vitamins & proteins to help make nails harder and stronger and repair natural nails. Prevents staining and discoloration and seals in moisture.
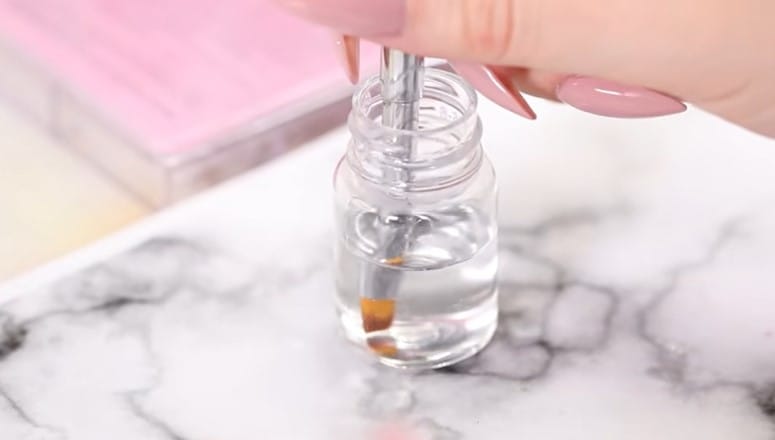
Step 4 Dip your brush in the included slip/alcohol-based solution
This is an important step, as it allows you to move the polygel around on the dual form (or natural nail) without the gel excessively sticking to the brush.
[amazon box=”B091DXNY5H” class=”lp-product-list” template=”vertical” image_size=”large” title=” ” price=” ” image_alt=”AROIC Acrylic Nail Brush Set” description=”none” button_text=”Check Latest Price” ]
You can’t go wrong with AROIC Acrylic Nail Brush Set. The nail brush set is made of nylon wool and sturdy plastic, which are not easy to bent. The hair of the dust remover brush is very soft and comfortable.
The nail brush set comes with 7 pcs UV gel nail art brushes, 6pcs 3D nail extension brushes, 6 pcs nail liner brushes, 5 pcs double-ended dotting nail pens, three pcs handle grip nail brushes, and one pc nail art dust remover brush.
The acrylic nail brush set will help make many different types of DIY nail art, such as painting flowers, making flat or 3D patterns, drawing lines, applying colors, and extending the nail gel.
Step 5 Squeeze polygel on the dual form or nail
Using your brush, evenly spread the polygel on the dual form and sculpt it into the desired shape. If using a dual form, press the polygel-coated dual form on your nail to adhere.
[amazon box=”B0BC46Z8XM” class=”lp-product-list” template=”vertical” image_size=”large” title=” ” price=” ” image_alt=”YADADA PolyGel Quick Upgrade” description=”none” button_text=”Check Latest Price” ]
You can try YADADA PolyGel Quick Upgrade; this 30ML tube of clear nail gel is the clearest, perfect to do encapsulated nails, inlay nails, dry flower nails, glitter nails, rhinestone nails, and nail designs on press-on nails.
It is also suitable for creating a nail extension in different shapes like square nails, oval nails, coffin nails, or french nails with this poly nail tube. This professional nail gel is great for both beginners and professional nail specialists.
YADADA gel extension nail builder for nails is stronger, more flexible, and easier to control than other nail extension gels. It’s lighter than acrylic and builder nail gel, making your nails look charming, with pretty length and neatness.
Step 6 Set the polygel
Cure your nails underneath the LED light to set the polygel. If using a dual form, remove it.
[amazon box=”B00MG2JHXQ” class=”lp-product-list” template=”vertical” image_size=”large” title=” ” price=” ” image_alt=” SensatioNail LED Nail Lamp for Gel Polish” description=”none” button_text=”Check Latest Price” ]
We recommend SensatioNail LED Nail Lamp for Gel Polish. The SensatioNail LED Nail Lamp is built to quickly cure gel nail polish.
The light source emitted by this gel nail lamp is perfectly safe on the hands and eyes. It will not darken your hands, so no sunblock is needed. It cures top/basecoats in 15 seconds and color in 30 seconds.
This nail polish lamp is easy to use with an automatic sensor. Simply place your fingers under the lamp, and the light will automatically turn on. It will flash after 15 seconds and turn off automatically at 30 seconds, so no timer is needed.

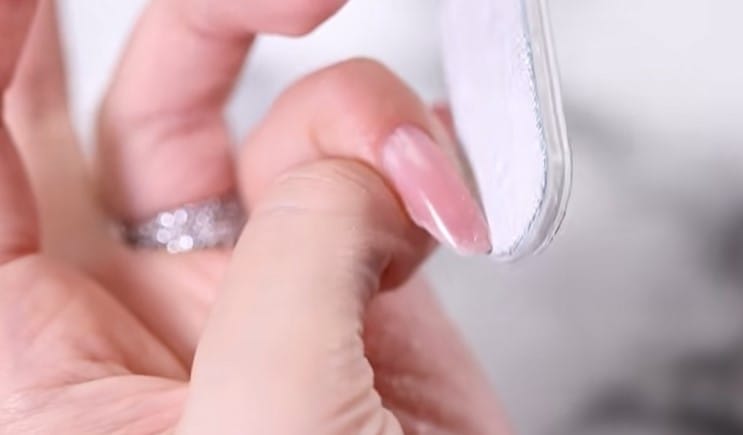
Step 7 Shape your nails
Cut, file, and shape your nails to your desired look.
Step 8 Finishing touches
Apply the top coat and cure your nails under the LED light one last time.
[amazon box=”B07GRDX693″ class=”lp-product-list” template=”vertical” image_size=”large” title=” ” price=” ” image_alt=”Young Nails Stain Resistant Gel Top Coat” description=”none” button_text=”Check Latest Price” ]
You can do so using Young Nails Stain Resistant Gel Top Coat. It is the perfect top coat for hairdressers or anyone who handles dyes. Professional grade protection for nail enhancements.
It helps prevent acrylic and hard gel discoloration when exposed to dyes or other substances that can cause staining. Professional grade protection for nail enhancements.
Use hard gels and acrylic nails for an extra layer of protection.
Tips
- Unlike hard gel, Polygel is not self-leveling but stays where you place it; unlike acrylic, it doesn’t harden until it’s cured in an LED or UV lamp.
- Cure time is about 30 seconds in an LED lamp or two minutes in a UV lamp. Polygel nails do not experience heat spikes during curing. There is no tacky layer after curing.
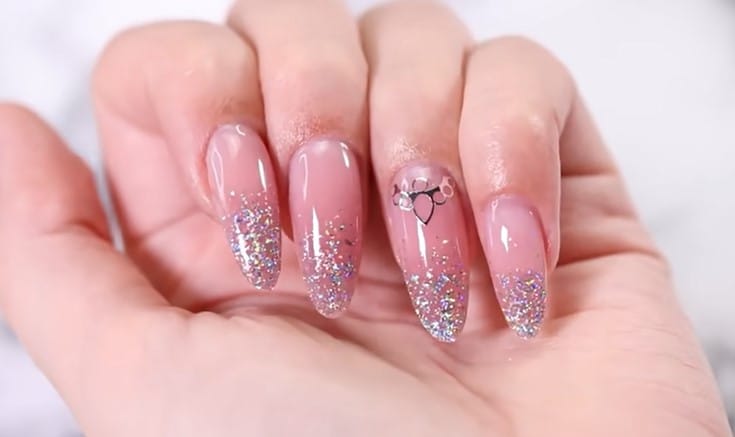
Common Question About Polygel Nails Designs
Can you do designs on Polygel nails?
Gel-polish colors can be applied over the product, and Gelish can be mixed with PolyGel to create a design.
Are Polygel nails better than gel nails?
When applied correctly, polygel is actually sturdier than hard gels. Experts describe polygel nails as strong, flexible, and feather-light, which means they’re durable but still feel like natural nails.
Are gel nails and Polygel the same?
Polygel can be applied as an overlay on your natural nails or as a nail enhancement. It is still cured under UV light, but it is much lighter than gel and acrylic nails.
It also has a much lighter fragrance, which is great for people that like the look of acrylics but can’t stand the smell.
How long do Polygel nails designs last?
If applied properly, polygel nail designs will typically last 21 days before needing maintenance. It’s a completely buff-off system.
Why do my Polygel nails pop off?
Too much or too wet polygel will cause it to pop off. Polygel that is not completely dry will cause it to lift around the edges first.
Always give enough time for the slip solution to dry completely before you affix your polylgel on your nails, and you will prevent this lifting problem.
Do Polygel nails designs break easily?
It is gel-based in terms of its consistency and texture but a bit thicker. When properly applied, polygel nails do not break easily.
In fact, they’re strong and flexible, despite feeling lighter than other solutions like hard gels. Their flexible nature also makes them more durable as time passes.
How do you remove polygel nails designs?
You can remove polygel nails designs using acetone. First, you’ll have to file some of it off like you do when removing acrylic nails, and then use acetone with a cotton ball wrapped around the nail.